Visualize Tables
Table Layouts Are Everywhere !
The key to creating tables is to visualize the table. If you understand what the table will look like before you begin, it will make it a lot easier to create.
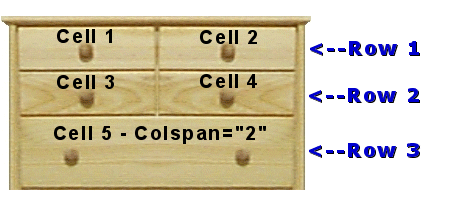
Below is an image of a "chest of drawers", this item is, believe it or not, a good example of what a table layout looks like. Many items you see everyday can be looked upon as laid out in tables.
Once you understand what tables can do, look around your home at items and see if you can see them as table layouts. Perhaps your front door with it's panels, or your kitchen cabinets, or even your house itself. They all have table layout qualities if you look for them.

Here is a our chest of drawers created entirely with a table code.
|
<--Row 1
Cell 1 - Cell 2 |
||||||||
|
<--Row 2
Cell 3 - Cell 4 |
|||||||||
|
<--Row 3
Cell 5 - Colspan="2" |
|||||||||
Here is the code for the above "chest of drawers" table. Take note at how the table rows and table cells are opened and closed to form the drawers of the chest.
When you desire another table cell in a table row, you close it with a </td> an open another <td>.
The same goes for the table rows themselves, when you wish to stop adding table cells to a table row, close it with a </tr> and open another <tr>.
I have spaced out all the table tags below so it will be easier to follow how the opening and closing tags are used.
<table width="310" cellspacing="0" cellpadding="0" border="3" bgcolor="#783E0A" bordercolor="#783E0A">
<tr>
<td align="center" valign="middle" background="wood1.gif">
<font size="7"><b>•</b></font>
</td>
<td align="center" valign="middle" background="wood1.gif">
<font size="7"><b>•</b></font>
</td>
</tr>
<tr>
<td align="center" valign="middle" background="wood1.gif">
<font size="7"><b>•</b></font>
</td>
<td align="center" valign="middle" background="wood1.gif">
<font size="7"><b>•</b></font>
</td>
</tr>
<tr>
<td align="center" valign="middle" colspan="2" background="wood1.gif">
<font size="7"><b>•</b></font>
<img src="clear.gif" width="170" height="1">
<font size="7"><b>•</b></font>
</td></tr></table>